Car Camping Window Covers [How to Make & Where to Buy]
![Car Camping Window Covers [How to Make & Where to Buy]](https://storage.ghost.io/c/82/26/8226fcac-0ba5-48ac-bc0b-f7d857cc1992/content/images/size/w1200/2023/02/workout-2.png)
If you're currently living in your car on the open road - or plan to - remaing stealth and ensuring your privacy is absolutely critical. To achieve this, you will need a good set of car camping window covers.
Car Camping Window Cover Options
Most people opt to make window covers for their car, which can be an easy and cost-effective way of ensuring privacy and protection.
Others choose to simply buy their car camping window covers. While this is a more expensive alternative, it does eliminate the time and effort involved in making them yourself. Further...
Any car window covers that are purchased will probably be of better quality & construction than if you crafted them on your own.
Let’s start with the first option, which is making your own car camping window covers. This isn’t too difficult, but does require purchasing some inexpensive materials, as well as your time.
Materials You’ll Need to Make Car Camping Window Covers:
- 4 Sheets of foam board, cardboard or coroplast (one for each window)
- Black fabric: felt is the cheapest, easiest to get
- Fabric glue or stapler/staple gun
- Marker, pencil or pen
- Roll of kraft paper or butcher's paper: (MUST be at least the same height in inches as your car's windows)
- Utility knife/razor
- Scissors
- Scotch tape
- 2 or 3 Rolls (wide) black tape (OPTIONAL): polyethylene tape is best. Duct tape - while not waterproof - is a cheaper option that will work almost as well.
Foam Board, Cardboard or Coroplast - Which is Best?
While all of these will work when making car camping window covers, each have their pluses & minuses. Below is a brief description of them…
Foam Board
Pros: Cheap, can be purchased at any craft or discount store, lightweight, easy to work with
Cons: Foam can break, can be ruined if gotten wet, not the sturdiest or most durable of materials (doesn’t offer much give)
Cardboard
Pros: Cheap, can be purchased at any office supply store or online, easy to work with, lightweight, durable when covered with tape or fabric, flexible (has give)
Cons: Can be ruined if gotten wet, warps easily, tends to shrink over time
Coroplast
Pros: Super durable, waterproof, flexible but still rigid, doesn’t shrink or warp
Cons: Very expensive material, can be difficult to find larger sheets in stores, costly to ship, somewhat difficult to cut versus foam board and cardboard
Most people use cardboard or coroplast. I myself chose the former, and my window covers are still holding strong today after one year, aside from shrinking a tiny bit. Again, all three options will work fine!
Step-By-Step Guide on How to Make Car Camping Window Covers:
Step 1: Measure Your Car Windows with Kraft Paper
This first step is the trickiest and most time consuming. But you only have to do it twice. Once for the front driver's row window, and once for the back passenger row window. You can use the same template for the opposite side window in each row since it will obviously be the same size.
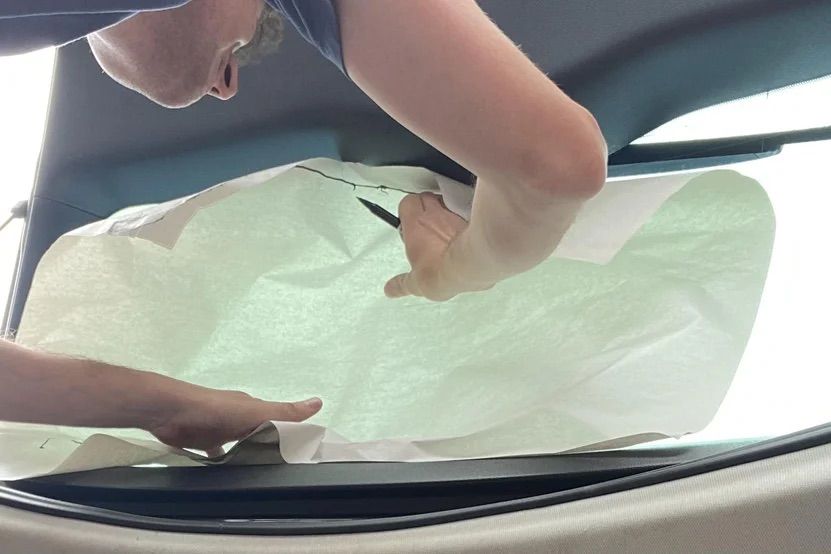
Cut a piece of kraft paper that's slightly larger in height & width than your car's driver's row window (either side). Make sure your windows are rolled up. Then, going around the entire window, tuck, push or wedge the kraft paper into the entire window frame, as the photo illustrates. *Be sure to cover the ENTIRE window fully with the kraft paper.
Next, once your kraft paper is formed to the window frame all the way around, grab your marker, pen or pencil and gently trace the entire outline of the window frame.
Remove the kraft paper and grab your writing utensil again. Write "DRW" on it (stands for driver's row window), and put the kraft paper aside.
You're now going to repeat the prior steps exactly - with the kraft paper and tracing - for the back passenger row window (either side). Once it's done, write "BPRW" (back passenger row window) on it and set it aside.
CONGRATULATIONS, you've just measured your car's windows! The hardest part is complete :)
Don't worry if your measurements aren't EXACTLY precise! As long as it's close enough, you can easily fix any small misalignments later on.
Step 2: Make Rough Cut of Kraft Paper
Using the kraft paper templates you measured in Step 1, you will now make rough cuts that can be transferred to the boards in the next step.
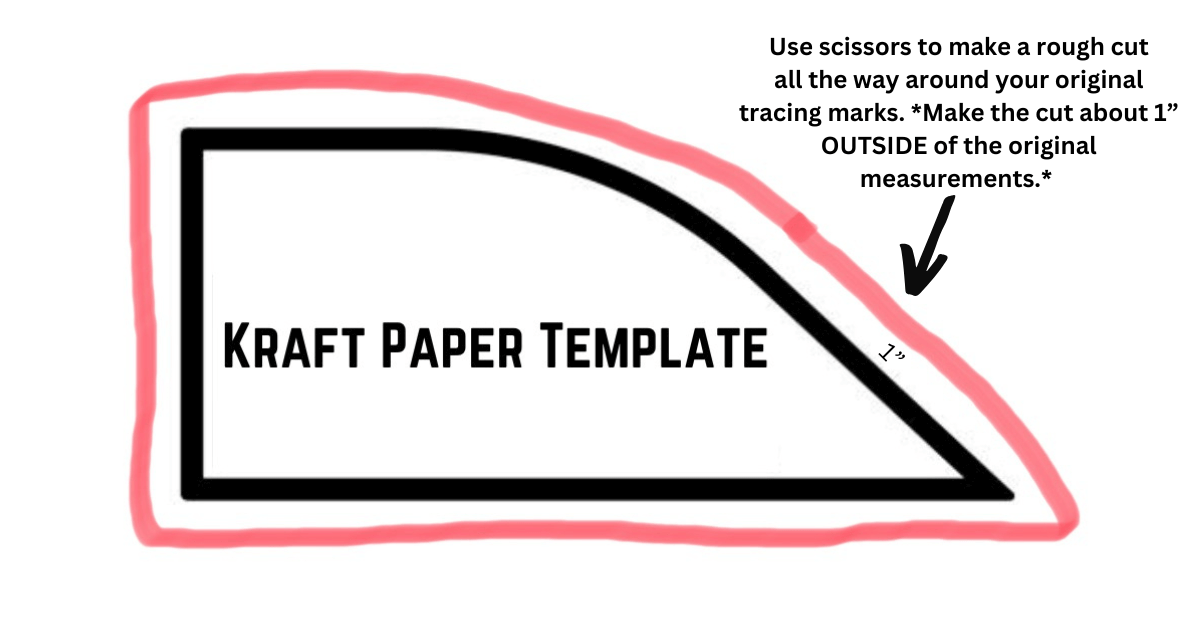
Take one of your paper templates (DRW) and fully flatten it out, as it will be scrunched up due to the prior step.
Once the paper is flattened and spread out, you will grab your scissors and make a rough cut that's about 1" OUTSIDE or your original tracing lines all the way around (see photo illustration above).
Repeat this step exactly for your other paper template (BPRW).
Step 3: Cut Your Foam Board, Cardboard or Coroplast
You should now have two rough cut paper templates (DRW & BPRW). We will use these rough cut templates to cut the boards for all four windows.
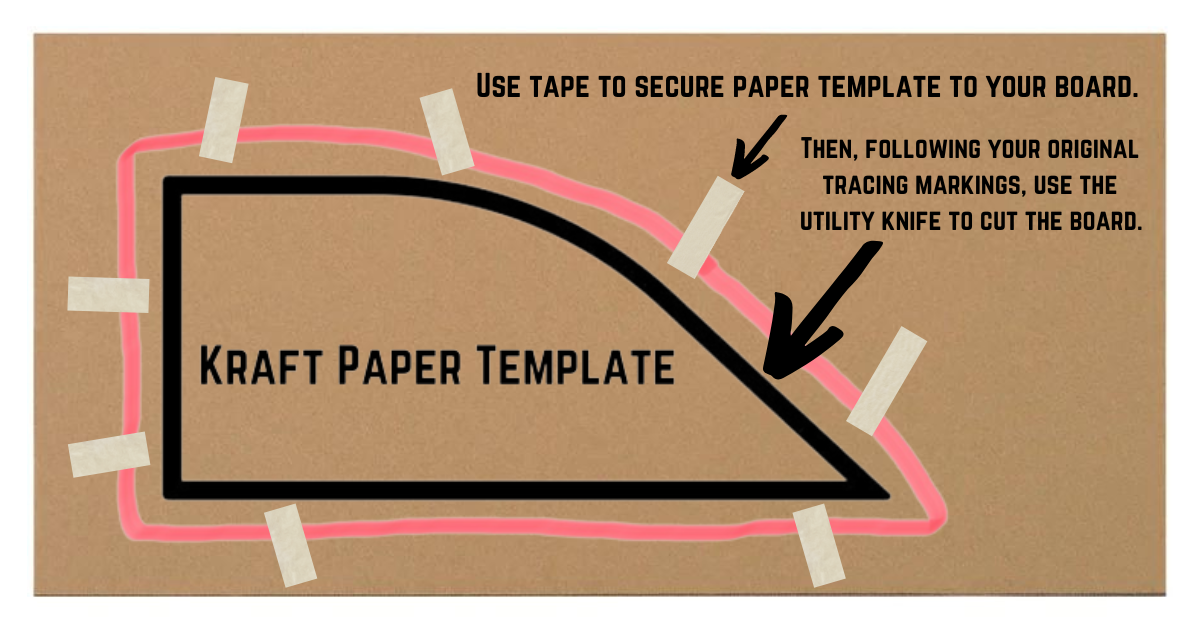
Begin by taking the first rough cut template (DRW) and taping it securely to one of your boards (see illustration above).
Then, using your utility knife, cut through the template into the board while following your original tracing outline. You may have to apply firm pressure to cut through both the paper & board. Be sure to do this step on a flat surface, which cannot be damaged by the utility knife.
*Write "DRW" on the board so you know which window it is for.
Repeat these steps exactly for the second cutout (BPRW).
Step 4: Making the Duplicates
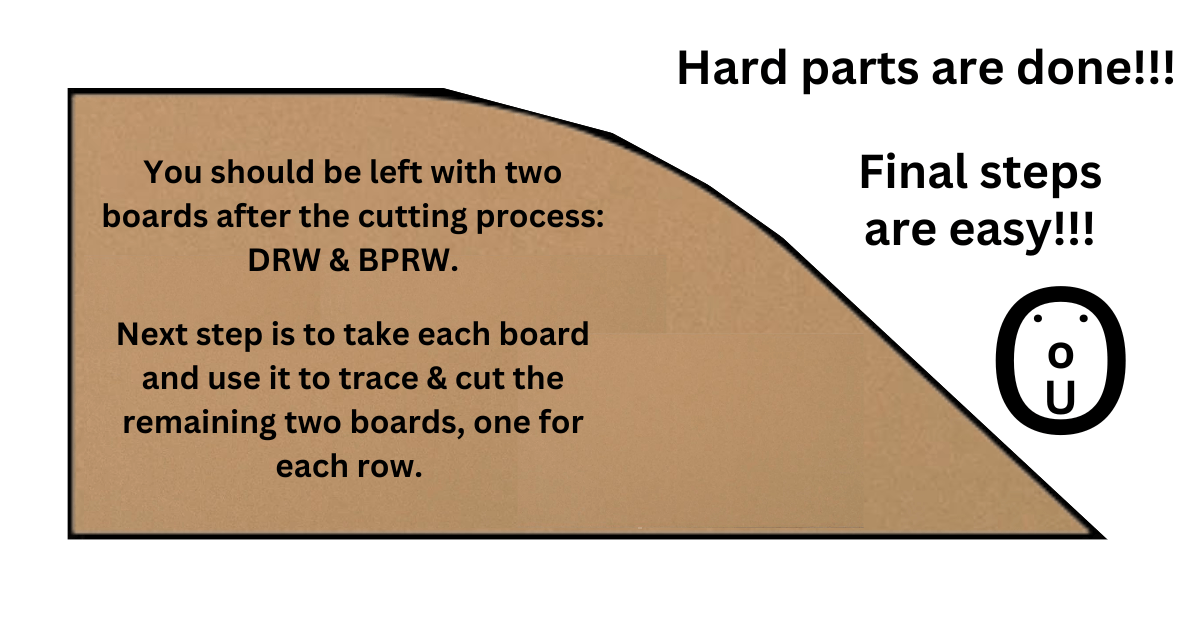
You should now be left with two nicely cut boards: DRW (driver's row window) & BPRW (back passenger row window).
You're going to use these boards as your new templates to cut out the other, final two window covers.
Take your DRW board and place it on top of one of the other uncut boards. Now, cut closely around the DRW with your utility knife using it as a template/guide to precisely carve out the new window cover underneath.
Once done, write "DRW" on it.
Repeat these exact steps with the BPRW and the final piece of uncut board.
Step 5: Test and Adjust Your Window Covers

After all this, you should have four boards - two DRW's & two BPRW's. These are your new window covers.
Now on to testing!
Take your two DRW's and try pushing them into the front window frames. If you traced everything precisely in the beginning - or even close enough - your window covers should snap into the window frames snugly. Then...
Repeat this with the BPRW's. Once again, they should pop into the window frames nicely.
If all four window covers fit snugly and stay in place, you can skip the following paragraphs and go directly to Step 6.
On the other hand, if one or all of the covers is either too loose or too tight, then continue reading to learn the easy fix.
If your window covers are too loose, here's what to do...
You can simply build up any gaps or receding areas with a few layers of black tape. If you measured even fairly precisely in the beginning, you shouldn't be off by much. So, adding a few layers in certain areas around your covers should not only help fill in any gaps, but should also make them fit more tightly/snugly. Also keep in mind...
That in the next step you will be wrapping your covers with black felt. The thickness of the felt may even be enough on its own to make loose covers fit more snugly into the window frames.
If your window covers are too large, here's what to do...
Simply trim away any excess material after marking the areas off with a pen or pencil. If you measured close enough in the beginning, you should only have a few spots that need additional cutting.
Step 6: (OPTIONAL) Wrap Your Window Covers with Tape
Many materials are susceptible to water, especially foam board and cardboard. If either of these get wet - by water hitting them directly or through condensation - they are essentially ruined.
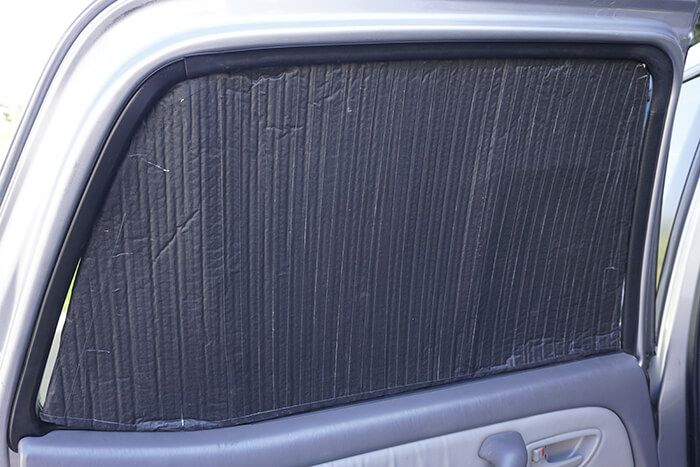
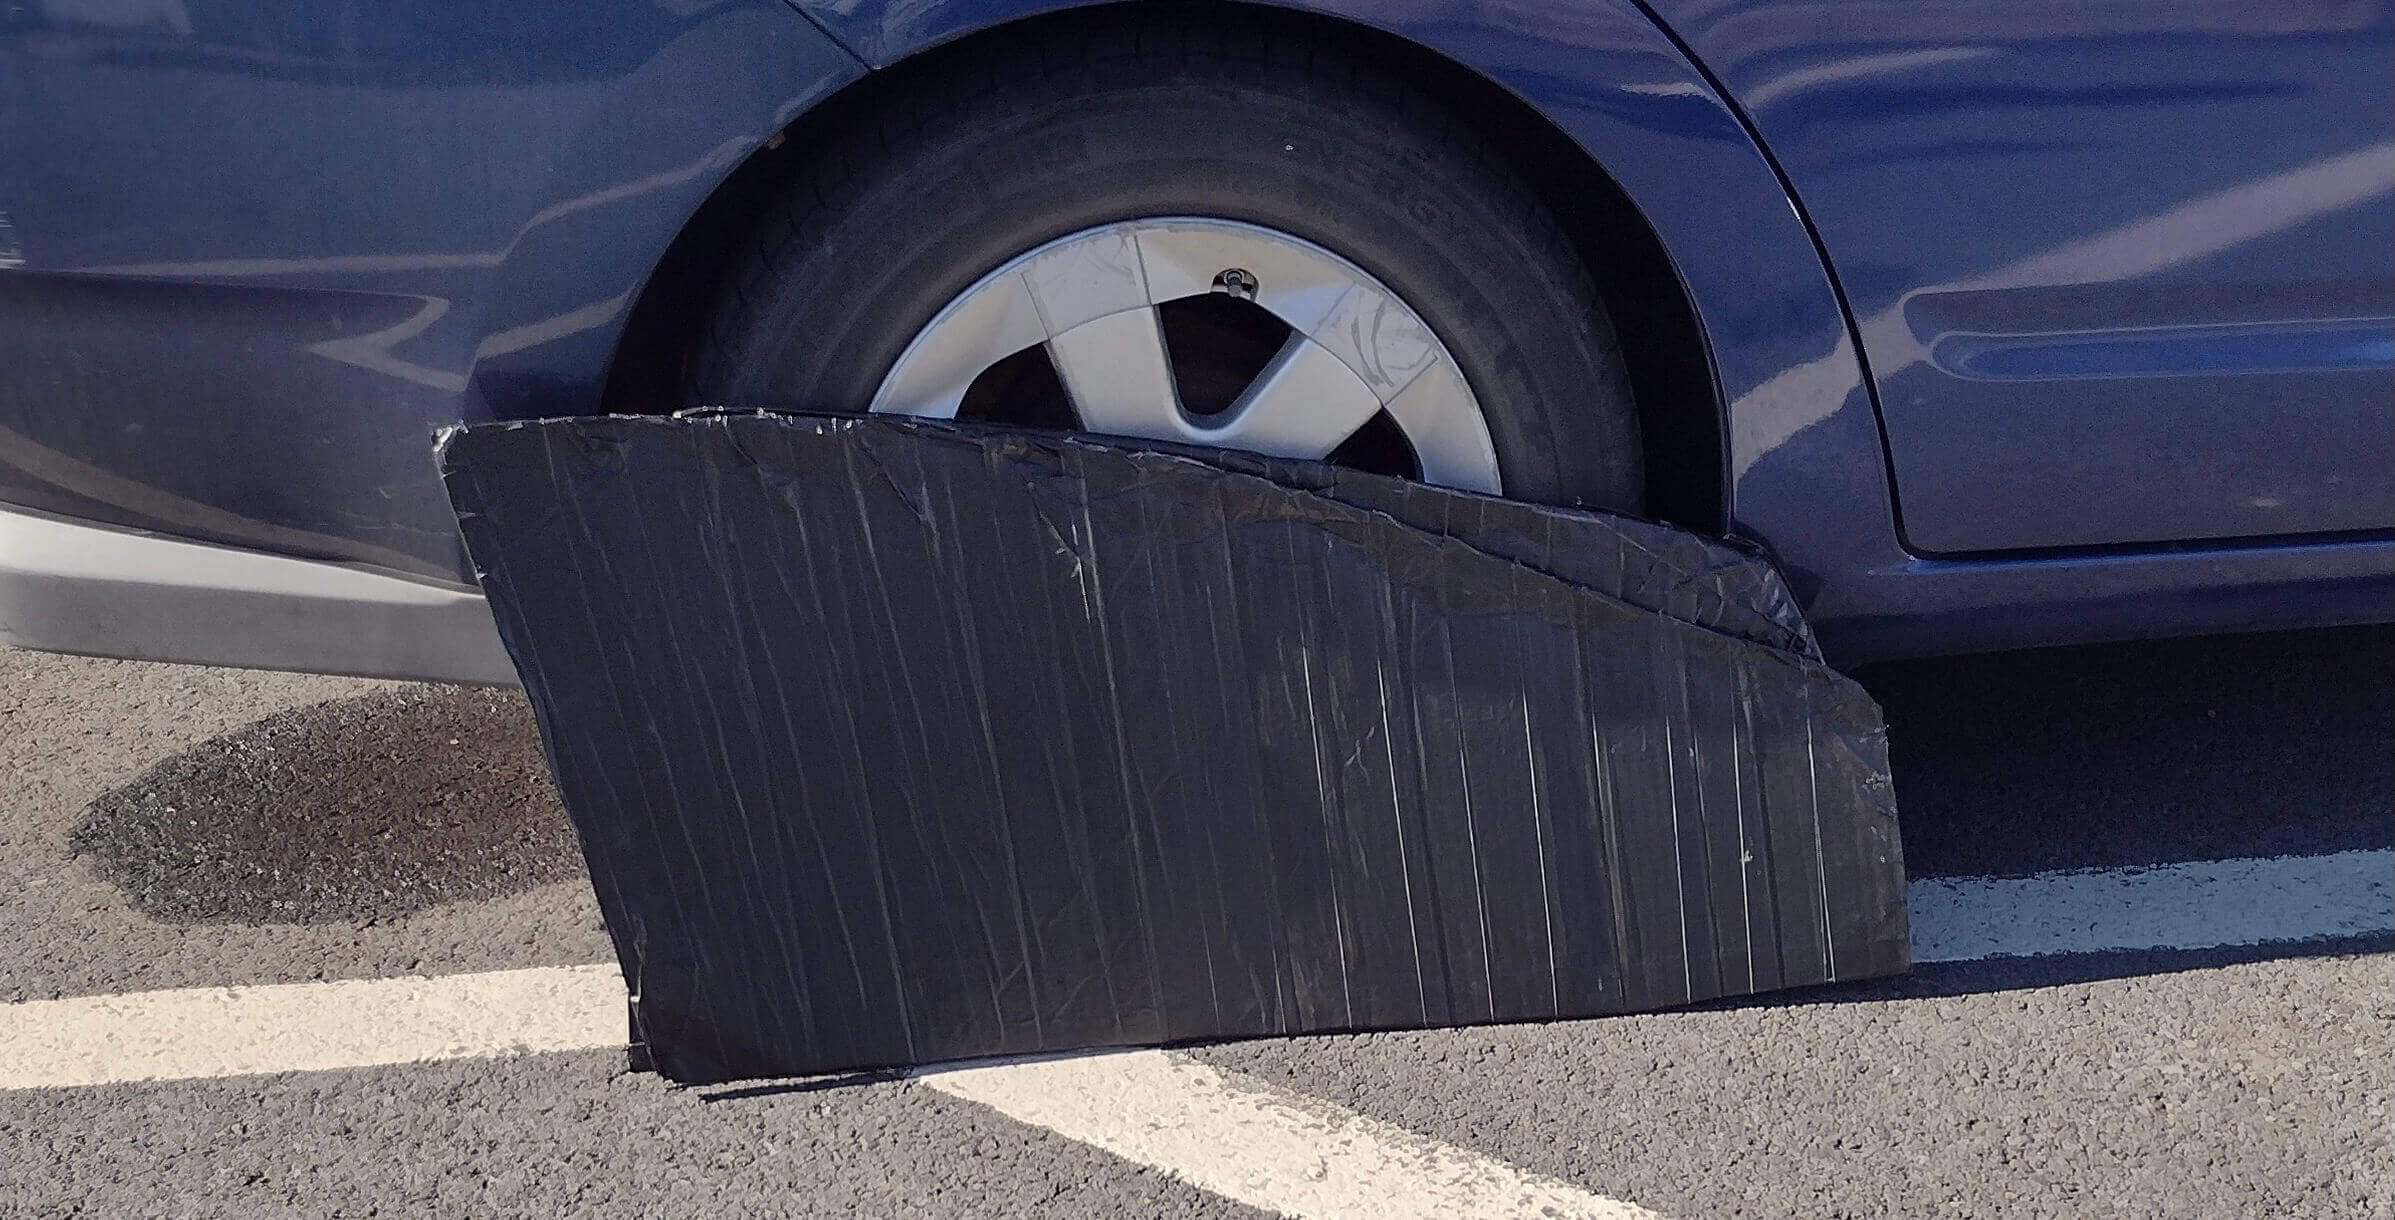
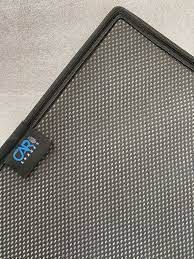
This is why I opted to wrap my car camping window covers (made of cardboard) with polyethylene tape...because it's waterproof and acts as a barrier. The photo above shows two of my covers wrapped with this tape.
In the event you also used foam board or carboard, and want to protect your covers, do this...
Buy the widest black polyethylene tape that you can. This will make wrapping your covers faster and easier.
Then, simply apply a layer or two all the way around each cover.
Once complete, you will have four finished, sealed car window covers that should last for at least a few years.
Just one last step!
Step 7: Wrap Your Window Covers with Black Felt

While there are many advantages of car camping window covers for nomads, the main two are...
They provide much needed privacy. They are fantastic for blocking out light & sun.
But if you wish to be as stealth as possible in your vehicle, adding black felt (or a similar material) is going to be key.
Once you wrap your covers in black felt and pop them in your windows, it literally appears that your windows are completed tinted, and nobody can see inside.
As you might be able to tell from the photo of my car above, I intentionally chose not to add black felt to my covers. Why? Because the covers with just the black tape I added still gives me 100% privacy, and I don't care that others might be able to notice the tape lines or that I have covers up (at night it's very difficult to make out anyway). However...
If your goal is to make it appear that you DON'T have window covers on your car, and you want a true, total blackout effect, then you'll definitely want to add the felt.
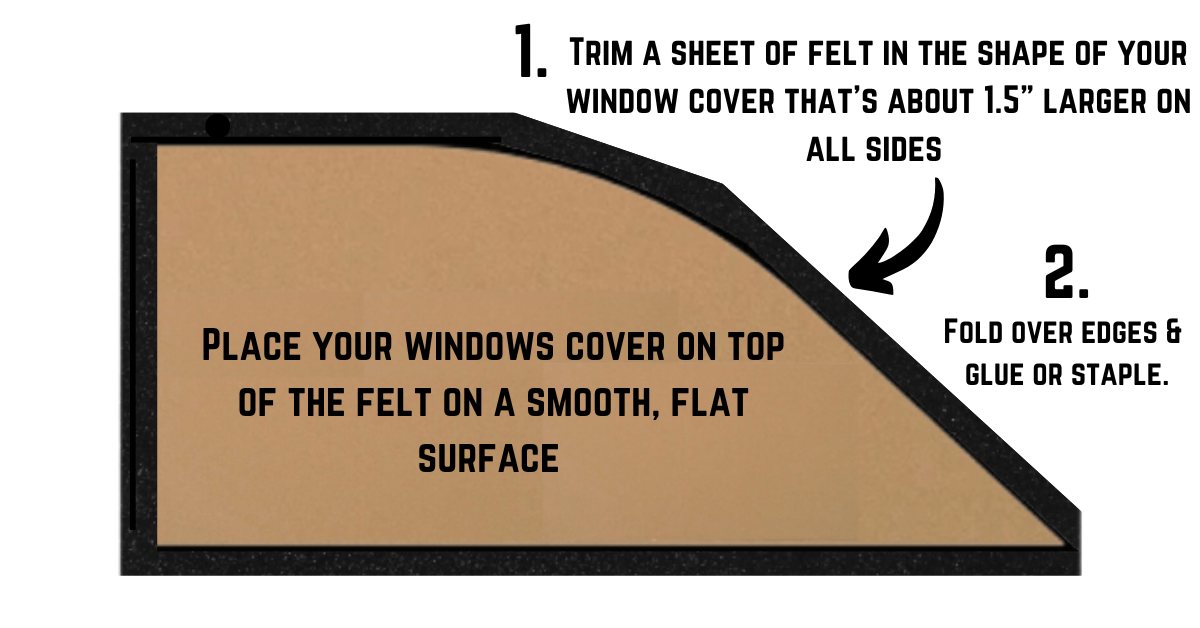
Get a sheet of felt and cut it in the shape of your window cover, but make sure it's wider by about 1.5" all the way around (see illustration above), then lay it down on a flat surface.
Place your window cover on top of the felt.
Next, grab your glue or staple gun, and start folding the felt tightly over the edges of the cover. Apply ample amounts of glue/staples as you go to help secure the felt.
To prevent the felt from bunching up (especially at the corners), try making a slit in the felt in those areas.
IMPORTANT: If you followed all of these steps closely, you should be left with snug fitting window covers, which is perfect! But getting them out can sometimes be tricky. I highly advise you to make a loop or tag and securely attach it to all of your window covers. This will give you something to pull on, which will help pop the covers out with ease.
That's it...you're done!!!
If you take your time and complete this project with care, your car camping window covers should last an awfully long time. I've been using mine for about a year now, and they're still going strong.
If you need them, below are a few links where one can buy some of the items for this project...
Places to Purchase Supplies
There are many places to buy the supplies you'll need. Feel free to shop around if you'd like. I chose to add a few links for your convenience.
Kraft Paper (Second option)
Roll of Black Felt (Second option)
Coroplast Sheets (Second option)
Cardboard Sheets (Second option)
Where to Buy Car Camping Window Covers
If you're not the crafty type, or simply wish to save your valuable time and purchase your car camping window covers instead, the following list of companies are very popular choices within the nomad community. I personally use window covers from Blinds4Cars.com, and can attest to their quality & convenience.
I use windows covers from this company, and they are top notch.
What's really awesome about Blinds4Cars.com is that unlike some of their competitors, they can get custom-sized covers for an EXTENSIVE amount of vehicles, even going back to the mid/late 2000's in many cases.
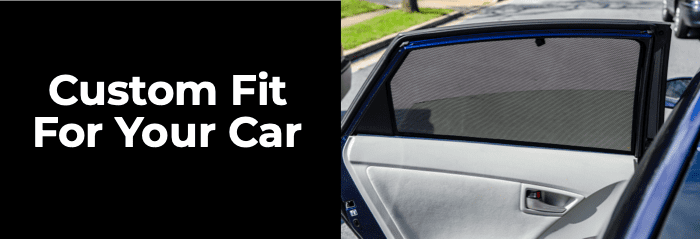
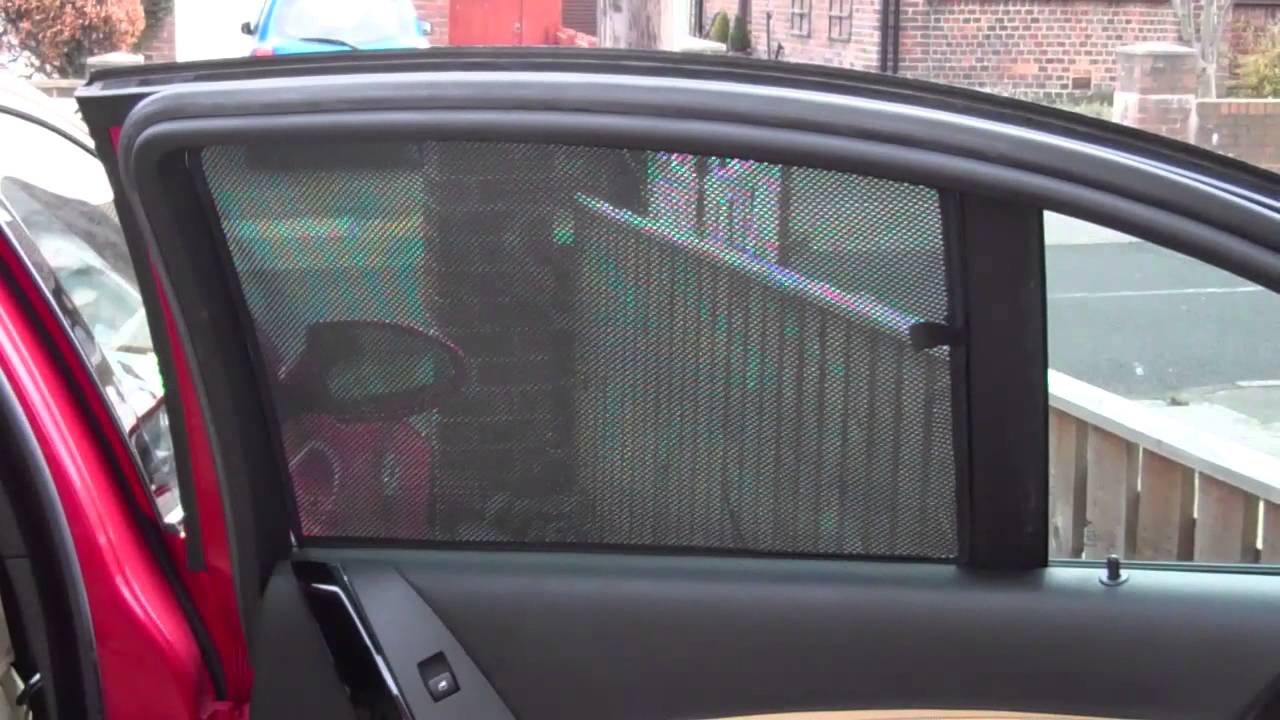
As you can see from the photos above, these window covers are not solid, but instead, feature a screen or mesh design. But if you want these to be blackout covers, there's a simple solution: just add black felt or another fabric over the mesh.
As a bonus, if you remove the black felt during the warmer months, these covers will also act as window screens, giving you air circulation and a cool breeze in your vehicle, while keeping the bugs out! I used just them like this throughtout the hot northeast summer last year.
While these guys are based out of the U.K., they ship regularly to the U.S., and the prices to do so are very affordable.
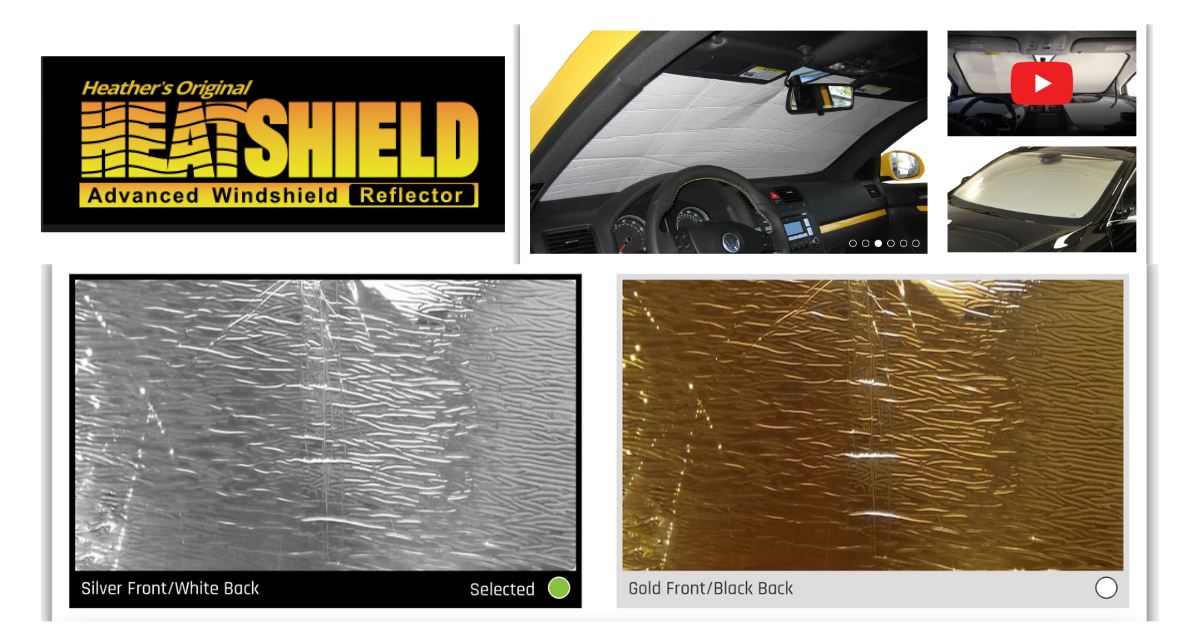
This outfit specializes is sun/privacy shades, and they have custom sizes for a large amount of vehicles, both new & old.
Because their sun shades for the windows comes in either silver or gold, you would need to paint them black if you want that true blackout effect. But painted or not, all offer superior privacy.
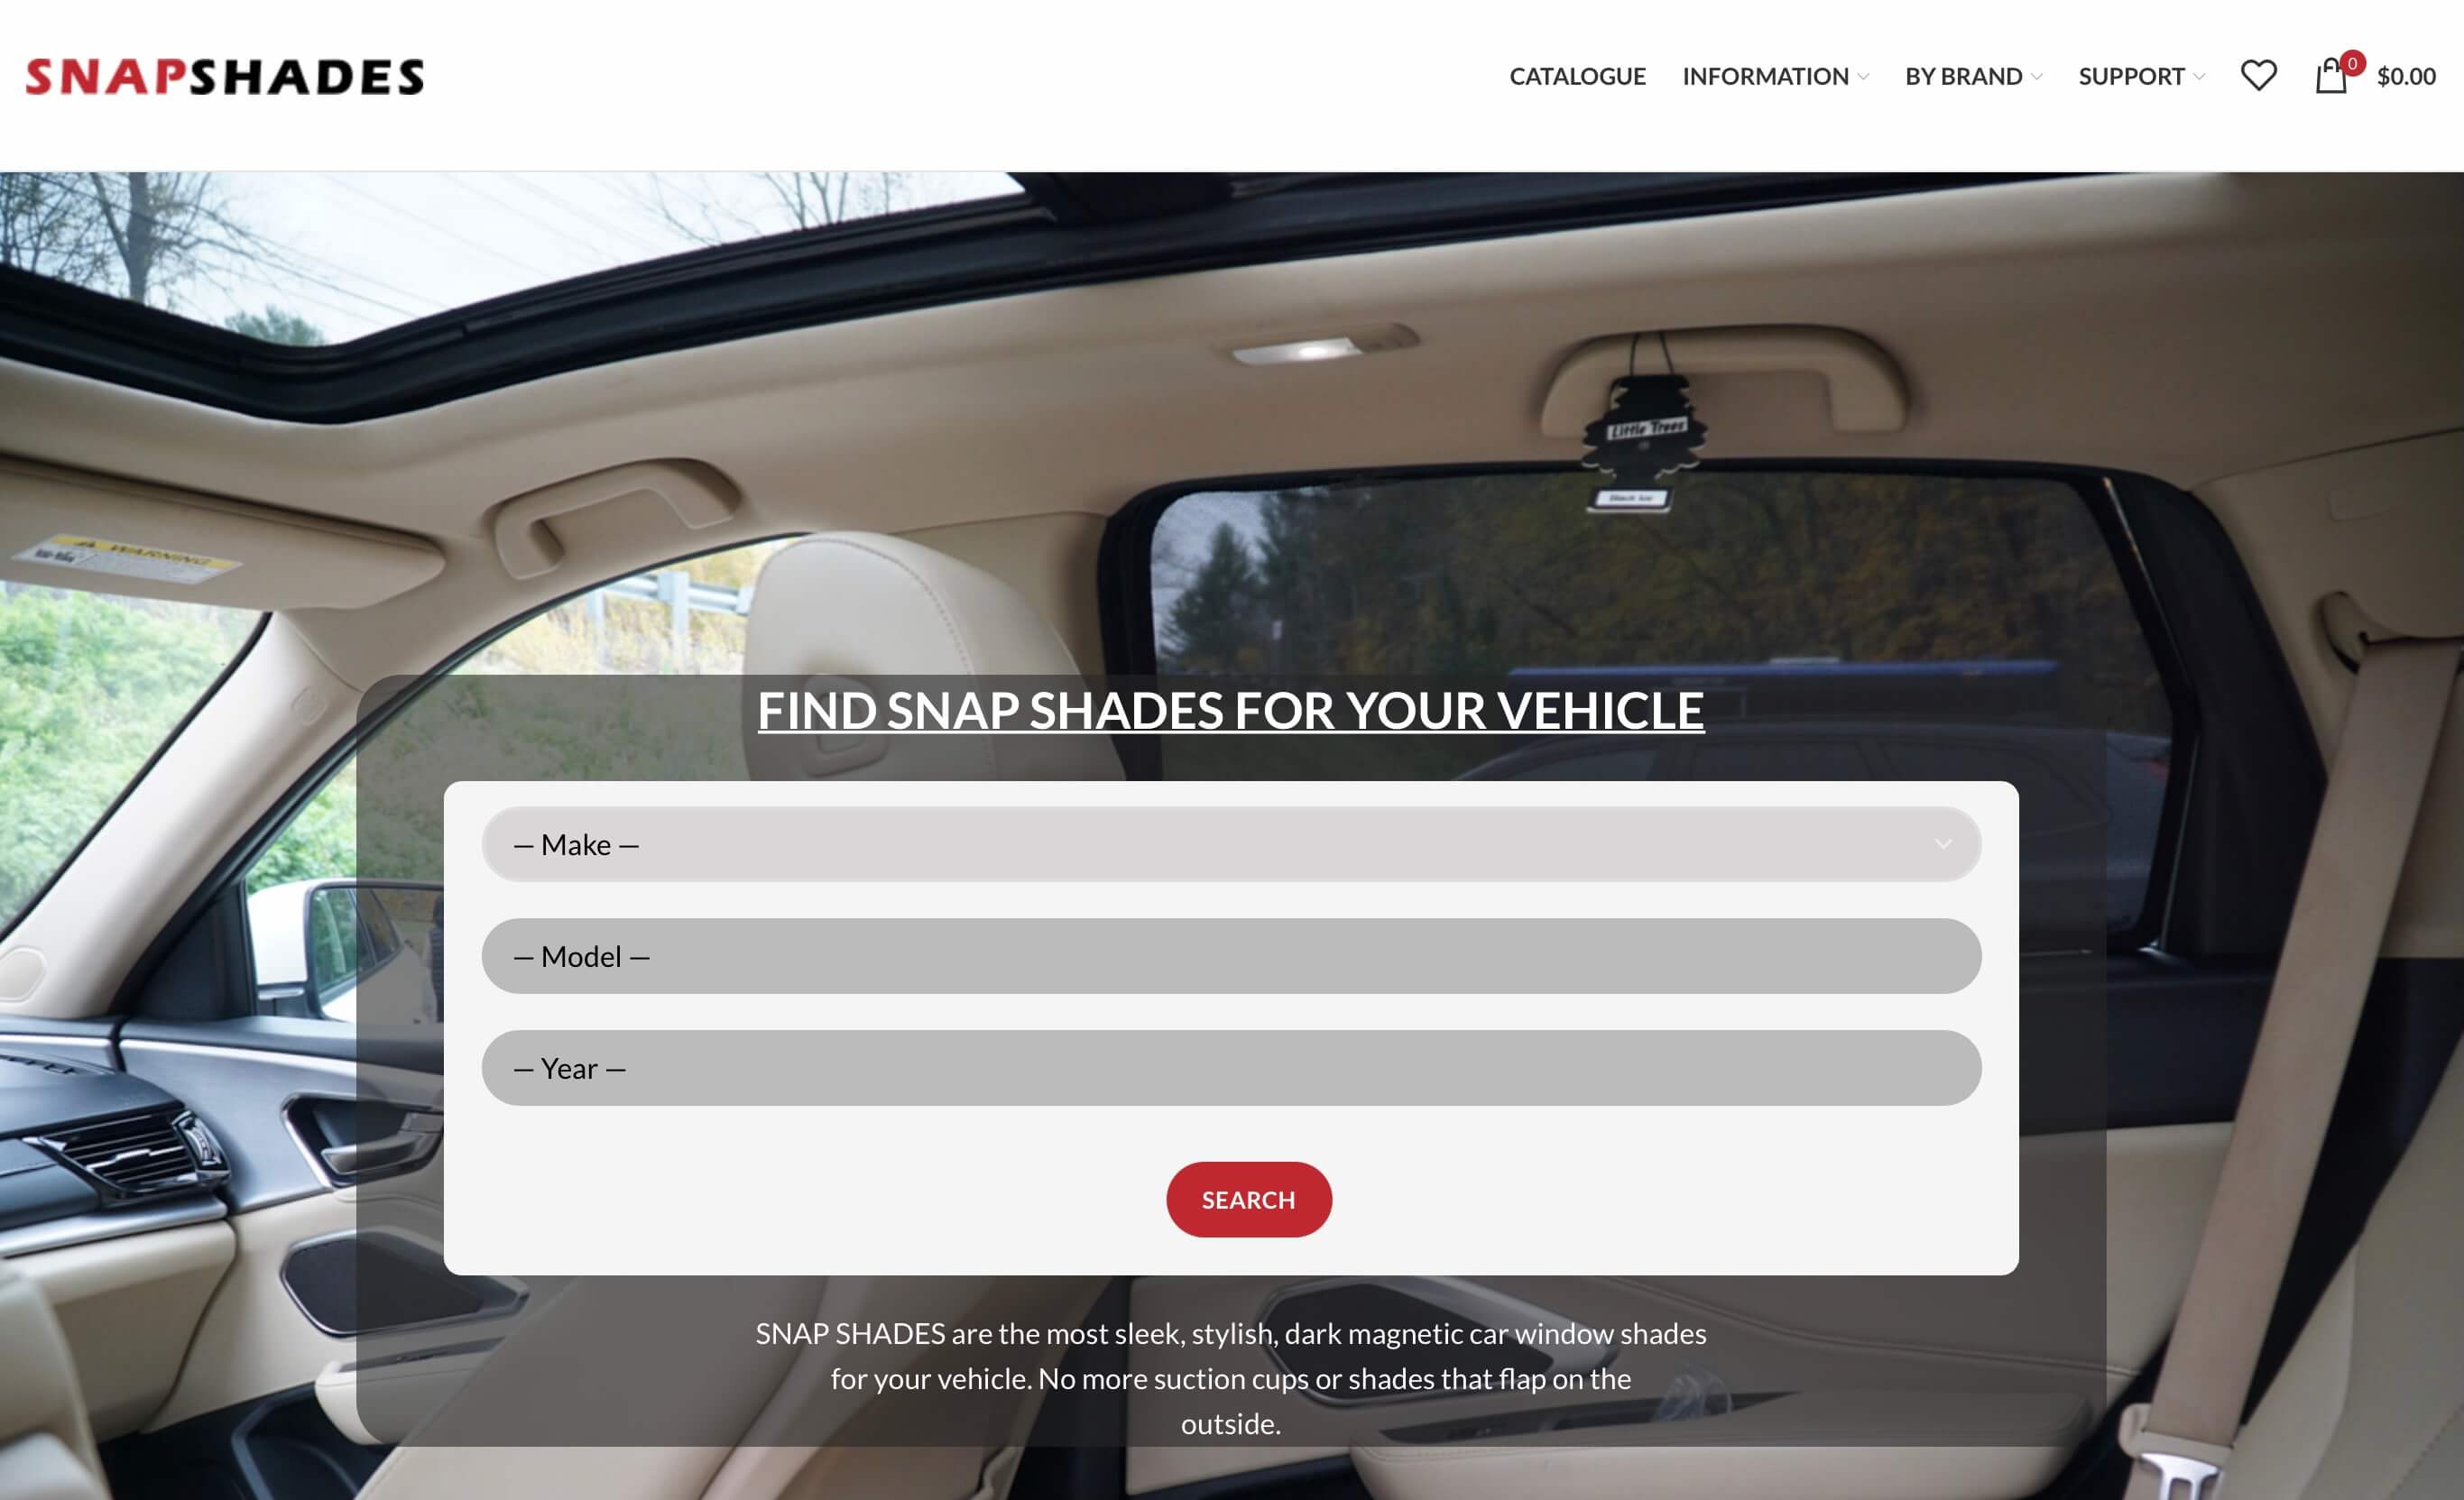
SnapShade.us is another alternative. Their covers come in a mesh type design, and as is the case with Blinds4Cars.com, you'll need to add some black felt or other material if you want to achieve that total stealth blackout effect for your windows.
While this company seems to carry covers for many different vehicles makes & models, I noticed that they only had covers for certain windows and not others; back versus front and vice versa for example. So, you'll need to do some digging and see if they have custom solutions for your particular car.
Final Thoughts
Privacy is king, especially when sleeping in your car as a nomad or stealth camper.
Whether you choose to make or buy them, a good set of car camping window covers will serve you well for many years to come.
If you have any questions regarding this article, drop a comment here. And if you used this tutorial to make your own window covers, and would like to show them off, I'd love to see them.
LIVE WISELY, LIVE WELL!